Similar to the Aphogee 2 Minute Keratin Treatment, this Aphogee product does wonders for restoring and repairing damaged hair. Before trying this product I have never actually done a hard protein treatment on my hair, which is pretty bad because I have chemically treated hair (relaxed and colored). Protein treatments need to be done on your hair every six weeks if you regularly use heat, color or relaxers in your hair regimen. When any of these are applied to your hair, your hair loses protein which can lead to breakage and shedding. This inevitably leads to hair loss and affects length retention. Are you starting to understand why your hair won’t grow past a certain length now? Great! Here is an article that explains the importance of protein treatments on hair.
I picked this product up from Sally’s for about $4. I didn’t get the accompanying shampoo nor did I get the full size bottles of Step 1 or Step 2, instead I picked up the sample pack (pictured below). I feel like this is a cheaper and more effective option because a hard protein treatment such as this one should only be used ONCE every SIX weeks. So, why pay more for full size bottles ($9 for 4 oz bottle of Step 1) when I’m only going to use this treatment once every six weeks. As my hair grows, however, I will need to get the bottles because this sample pack was JUST enough to cover all of my hair. I tried my best to find a YouTube video that shows how to apply this treatment, and this one is pretty accurate. She doesn’t go into enough detail, in my opinion, on how to wash out the hair or how to apply Step 2 so I’ll make sure to cover that thoroughly.
INGREDIENTS
STEP 1
Deionized Water, Hydrolyzed Animal Protein, Magnesium Sulfate, Citric Acid, Ethylene Urea, Dimethylol Urea, Cocamidopropyl Betaine, Magnesium Carbonate, DMDM Hydantoin, Fragrance
STEP 2
Water, Glyceryl Stearate, Cetyl Alcohol, PEG-100 Stearate, Glycerine, Stearalkonium Chloride, Petrolatum, Cetearyl Alcohol, Mineral Oil, Oleyl Alcohol, Squalane, Acetamide MEA, Panthenol, Silk Amino Acids, Allantoin, Collagen Amino Acids, Hydrolyzed Elastin, Cylclomethicone, PEG-150 Stearate, Polysorbate-60, Steareth-20, Proline, Alanine, Tryptophan, Sage Extract, Chamomile Extract, Rosemary Extract, Citric Acid, Methylparaben, Propylparaben, Fragrance
WHAT YOU WILL NEED
Butterfly clips
Wide tooth comb
Bowl
Applicator brush (optional)
Towel
Bonnet Dryer
HOW I USE IT
When applying this protein treatment, I start on freshly washed hair. The instructions say to use Aphogee shampoo but I like to stick to my SheaMoisture Yucca & Baobab shampoo. After this is done, without applying conditioner, I begin to dry my hair with either a soft towel or an old t-shirt. I like to start by pouring Step 1 into a bowl and mixing it with an applicator brush. In the YouTube video, she uses her hands to apply the mixture instead of an applicator brush but as this mixture dries extremely fast and gets super sticky, I believe an applicator brush is more effective. After Step 1 is in the bowl, I quickly section my hair into 4 sections with butterfly clips. I start on the first section by applying the mixture, with the applicator brush, to all of my hair within each section. Quickly using a wide tooth comb to detangle and distribute the protein treatment throughout each section. This step will need to be done quickly because after the protein treatment dries you will not be able to move your hair. It will become very dry and should not be manipulated as hair is susceptible to breakage at this point.
After all the protein treatment has been applied to your hair, you will need to wait for your hair to dry before rinsing out this treatment. You can air dry your hair but depending on the thickness of your hair, this can take a long time. I suggest the use of a bonnet dryer instead. When using a bonnet dryer, make sure not to manipulate your hair HOWEVER if hair is not drying at the ends of your hair you can carefully clip up your hair with duckbill clips to make the process go a bit faster.
After all your hair is dry, you are ready to rinse! You’ll realize that your hair is super hard to the touch, like a helmet even. It’s important to rinse IN the shower because you’ll need water to run over your hair for about 2 minutes before you can begin to manipulate your hair. Once two minutes have passed, you can begin to rinse the treatment out of your hair. You’ll quickly realize that your hair feels like straw and is super dry to the touch. This is normal and not a cause for concern! At this point, I like to step out of the shower and apply Step 2. Step 2 is the balancing moisturizer. This step smells SO GOOD, unlike Step 1, and immediately restores your hair’s moisture. This step has SO MUCH SLIP and you can mix your favorite deep conditioner in to ensure even more moisture. I like to steam my hair for about 30 minutes at this point, with no plastic cap, but you can also sit under your bonnet dryer for 30 minutes WITH a plastic cap. This extra step ensures maximum penetration!
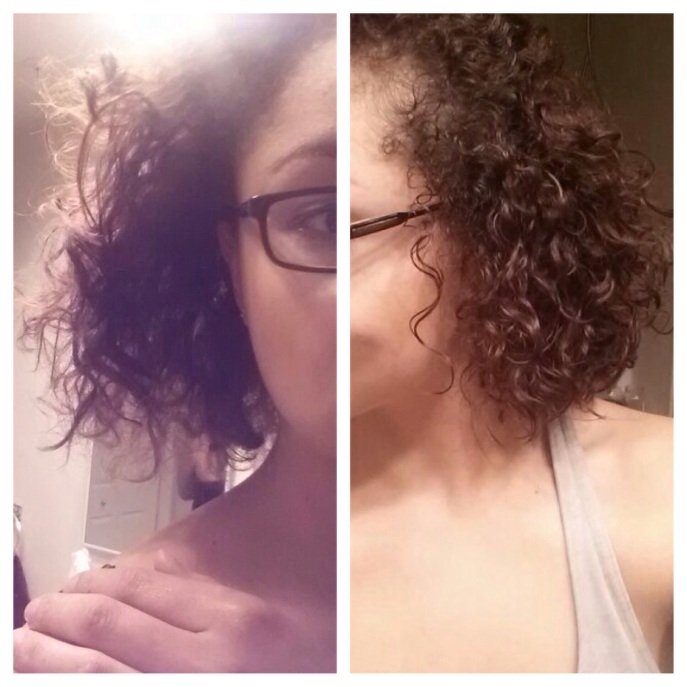
After 30 minutes is up, you are ready for your final rinse! When your hair is fully rinsed, you will immediately see and fell the difference! Especially naturalistas and curly heads, your curls and coils will be tighter and shinier than ever!
Here is a picture of the sample pack. Below that is a picture of my sister’s hair before (left) using the treatment and after (right) completing step 1 and 2. Amazing results!


